Friday, February 12, 2010

It's Olympic knitting time!!

The laundry is done.  The house is as tidy as it can be really with 2 boys barreling around.  The hubby is on a two week paternity leave starting today at 5pm.  The take out order has been placed for tonight.  Friends and relatives have been notified of my hermit status for the next 2 weeks.  And my Ravelympics project is on standby...


That's right!  It's Olympic knitting time bay-bee and I can barely contain all my excitement:  all that knitting, all that cheering, all that pride in hosting the games, all that guilt-free telly watching for hours on end while completely ignoring all household chores....  Just bliss!

I'll be competing in the sweaterboard event on Ravelry and attempting to knit a (heavily modified) Sesame cardigan for myself from stash Rowan All-Seasons cotton and another mini version for Abbey in 17 days.

Can barely wait until 9 tonight to cast on!  These will be the best games ever!!

Go, Canada, Go!

Wednesday, February 10, 2010

Mmmalabrigo!

I've felt wool.  Even merino wool.  And I know that quality wool can be soft.  Soft enough for next to baby's skin even.  But Malabrigo?  That is some kind of dreamy butta.  And once you try it... well it's hard to stop!


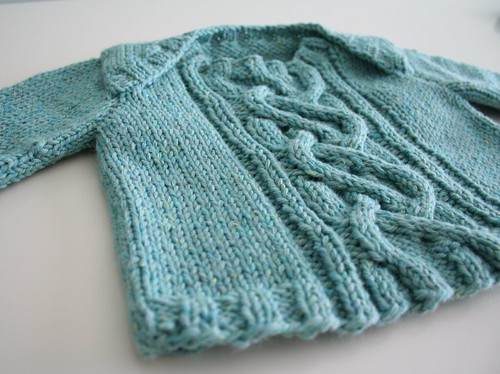
I started with five balls last fall.  It came highly recommended for soakers and since I was planning to cloth diaper baby I was primed with the perfect excuse to order it!  With those five generous balls I knit her a pretty compete trousseau of yummy goodness starting with a placket neck sweater from Joelle Hoverson's Last Minute Knitted Gifts (one of my very favourite knitting books).  It took less than a ball of Malabrigo and man has she gotten wear out of this one.  It is just so darling.  And comfortable.  And dreamy.  Love it!


Then came the picky pants.  I used Theresa Belleville's pattern over at 
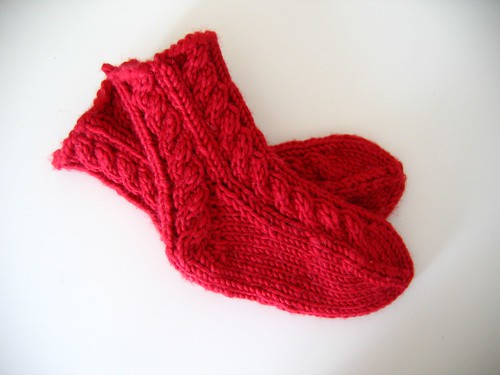
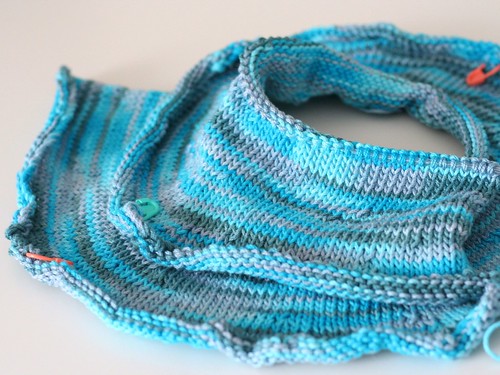
Little Turtle Knits and knit them with both increases and short rows to accommodate her fluffy cloth diapered bottom.  I knit the medium, small and extra small sizes and was pleasantly surprised that each used up just one ball of Malabrigo (in lettuce, glazed carrot and dusty pink respectively).  There were even leftovers from which I knit a striped pink and orange soaker (in first picture above) using Radiant Twist's trim-fit soaker pattern.


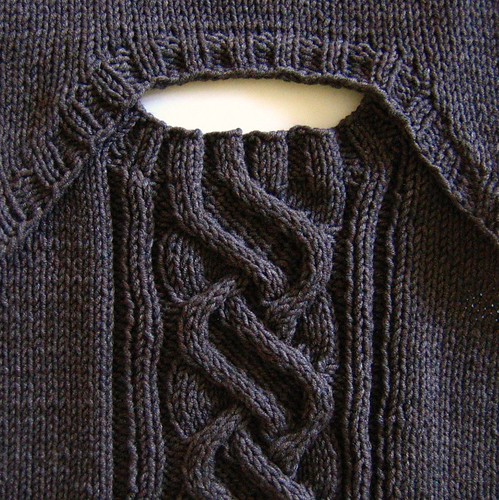
Then came the most adorable thing I've ever knit: the Juliette skirt and soaker pattern from Tia Novick for Julibeans.  I knit the A-line version and finished it off with the tedious but lovely picot bind-off.  Love, love, love it!  She doesn't get to wear this one as much because it's just too cold really to keep a teeny baby in tights but I see lots more of these in my future for spring and summer. The colourway is Violetas (how fitting for my little Abbey Violet ;0) and it also just used up one ball (I knit up size small).


What?  There is yarn left?  Well then, let's make some booties, shall we?  I knit up two pairs of Dreambaby Booties from Fabulous Yarns.  Getting the pattern is kind of a pain because while it is free you still have to checkout from the site with it but totally worth it because it is the simplest bootie pattern you will ever knit.  I only knit 6 rows of garter stitch at the beginning (3 garter bumps) and then knit the rest entirely in stocking stitch.  Lovely.  And they never fell off!  She wore these lots and lots.  Mine ended up being different sizes because I used different sized needles.  Unfortunately, I didn't document that part so have no idea which needles I used :0/


And after all of that, there was still enough yarn for a little newborn hat.  And a flower binky holder using Susan B. Anderson's free pacifier clip pattern.  Isn't it great to knit for winter babies?  Everything is so quick and uses so little yarn.  I can't believe I knit all this from just five balls!  The only downside to this yarn?  It pills.  Like mad.  Better reason yet to use it for wee wee babes that don't move a lot ;0)


Sigh.  What a wonderful week that was.  It was also what pulled me back into knitting after such a long break and it was just the medicine I needed.  So if you've heard the malabrigo rave before but didn't believe it, believe it!  It is that wonderful ;0)

So naturally, now that she started outgrowing that first lot of malabrigo goodness, it was time to hit the shops again in search of more glorious malabrigo for her 3-6 month trousseau!

More on that next time...

Monday, February 08, 2010

I'm up for a Bobby? What?

I got a message a few days ago on Ravelry thanking me for my info on how to take better photos and wishing me luck for the awards.  Awards?  What awards?  Turns out I've been nominated for a Bobby Award on Ravelry for "most educational post/thread".


The post was a response to a thread on how to take better pictures of your knitting and I thought why not reproduce it here for any of you not on Ravelry who may have been wondering about my photos.  So here it is:

posted about 1 year ago (Sunday, July 6), edited about 1 year ago
reply to Gidgeflibbit's post #27
I am a researcher by trade (actually I was a researcher, now I’m just a mom with knitting design aspirations ;0) but I did take a certificate in photography from the Adult Ed faculty of a local university (Concordia in Montreal) for fun as a hobby and found it not only super cool (this was in the days of film cameras and actual darkrooms with red lights and lots of chemicals…you know, like sooo 5 years ago!) but it has served me so much over the years. Most important thing I’ve learned: it’s not the camera, it’s you bay-bee!

98% of the pictures on my blog and here on Ravelry are from a very reasonably priced Canon Powershot point and shoot digital camera that I bought 4 years ago.
Here’s my modus operandi for knitting picture taking:
{1} As many have noted before, natural light is a must. Flash does terrible things to knitting and people. Don’t do it!
{2} Neutral background is best. I take most of my knitting photos on top of my son’s white dresser.
alt text

{3} Before you snap, take a moment to carefully look at your ‘pose’ through the viewfinder (or LCD screen) and remove any distracting elements in the background. I like to remove everything but the knitting (since we all know everything else is completely irrelevant anyway, LOL!) If you can’t remove a distracting element, angle your camera in such a way that you don’t see it anymore.
{4} Check your angle! Sometimes it’s nice to have a low angle on your knitting especially with close-up shots of your handiwork for a nice artsy shot.
alt text

But for each project, I try to also have a no frills shot which I take by standing up on a chair so I’m high above my project (which is usually laid out on my son’s dresser) and try to hold the camera as parallel as possible to my knitting project so that it is not distorted at all.
alt text

It helps if you have a straight line as a point of reference: just keep playing with the camera’s angle until the straight line in your photo is also perfectly straight (see how the lines in the ribs below are parallel to the edges of the photo…)
alt text

{5} If your camera has a “macro” setting which on most camera is represented by a little flower icon - use it ALL THE TIME for still shots of your knitting…even if you aren’t close. That’s how you get cool effects like sharp focus on parts of your knitting and nice blurry backgrounds (especially prominent if you are at a low angle so that parts of your knitting are closer and others are further away from the lens as it’s the distance from the lens that causes some stuff to be in focus and others to be further).
I also use the macro for further away shots to stabilise the lens and avoid motion blurr, especially when the light isn’t great but I don’t want to use the flash. When you set your camera on macro and then hit the button to snap your picture, you’ll notice that it sometimes takes the lens a few extra seconds to get it’s focus and that it automatically takes the shot when it does get focus. This way, the camera won’t be ‘shaken’ with the pressure of your finger on the shutter at the very moment it takes the shot so your chances of avoiding camera shake with the macro are actually pretty good even in low light situations… Of course, the macro is fantastic for it’s intended purpose as well which is taking really close-up shots.
alt text

{6} For really nice saturated colours and great sharp contrasts, check your camera’s manual to see if you can set the “White Balance” or “Colour balance”. Most cameras have this feature. On my camera, if I go in the menu where I can set “black and white”, “sepia”, etc… there is also an option for “vivid” which I always select as the default. This makes the colours truly pop while being true to themselves. If you don’t have this option, see if you have a setting for “shade” which basically gives you the same result.
alt text

Finally, check out http://www.kenrockwell.com/tech.htm for lots of fantastic (really, really fantastic) tutorials and how to’s for great photos. You have t scroll down a bit to check out all the articles on every photography topic you can think of. This guy’s really great at explaining how to get the most from your camera in a real straight forward way.
Hope this helps ;0)


I'm so excited!  I don't know who nominated me but I'm thrilled that someone felt it helpful enough to nominate.  So thank you whoever you are!!
p.s. - my Ravelry username is annypurls for anyone who might be interested in friending me there ;0)

p.p.s. - don't know what Ravelry is?  Check it out at www.ravelry.com

Wednesday, February 03, 2010

Sewing?

I've always wanted to sew.  About 8 years ago, my honey bought me my very first (and only) sewing machine as a Christmas present.  I was so excited to sew curtains, and placemats and slipcovers to decorate my apartment. But when I sat down with it and the operator's manual one afternoon, I was struck by a big dose of reality:  I don't actually know what I'm doing!


I couldn't even thread the darn thing!  It was such a disappointment that I tucked it in the closet and forgot about it.  When Julian was a wee babe, I dusted it off and gave it another go, this time enlisting the help of Stephen's mom who is a phenomenal seamstress.  But somehow those projects never quite worked out and most were never even finished.  But each one taught me a new technique: cutting and pinning, sewing straight lines, pressing seams, zig-zag stitch, sewing along curves...


They taught me enough that when I came across Onegirl's Fleur Playmat pattern before Christmas while looking for a cute girly playmat for my Abbey I actually thought that perhaps if I took my time and followed the instructions carefully one step at a time then maybe I could make it myself...


I started with the petals.  Sewing curves is hard!  Some are rounder than others but having to sew 36 of them gave me lots of practice and by the end they were looking great!  I stuffed them with batting and stitched down the center and put the whole project on hold.  For weeks!  I was too scared to go on.  I had picked up some lovely coral cotton at Wal-Mart of all places while shopping for good scissors and thread and ordered the cushiest plush minky for the face and frankly had no idea how I would put the two together since the minkee is stretchy, it's a circle, and it's front and centre (literally) on the playmat so any puckering would be really obvious.


Then yesterday, after a nice evening stroll with my neighbour, I decided to go for it!  I think the stars must have been perfectly aligned because everything I tried worked out perfectly the first time.  I wandered from the pattern instructions a bit and still everything worked out!  I decided to apply the face to the big circle using heat bond and was pleasantly surprised that is worked and didn't melt!  Then I zig-zagged all around even though the heat bond instructions said not to and that worked out too! I did the same for the cheeks (cut from an old accidentally felted sweater) and embroidered on the eyes using stash acrylic yarn.  


Could it be?  Did I just totally make this?  It was 2am by the time I had sewn on the petals, the backing and stuffed it all with batting.  I quilted through all layers by sewing around the face which caused it to pucker a little but I can totally ignore that part because OMG I totally made this!! I considered waking everyone to show them while giddily jumping up and down exclaiming "I made this!  I totally made this!"  But wisened up and went to bed.


Here it is in Abbey's nursery.  Oh, I'm so so pleased!  Tired and cranky (after weeks of sleeping through the night Abbey woke up at 2:30 am, 4:30 am, and 6:30 am last night) but still beaming with excitement.

I think I can totally sew!

Friday, January 29, 2010

Abbey who?

We decided to name Julian Julian because we liked the name, of course, but also because we liked the obvious nicknames: Jude or Jules.  But as soon as we saw his little face, we knew he needed another interim nickname that was more fitting to his little tiny, pudgy, round-faced self. 


Stephen was the source of many of the first attempts like captain pipi pants, shoe-dini, and jubilee bubilee.  Then came Oblio after the main character in Harry Nilsson (and Ringo Starr)'s The Point.  But none of these stuck as THE nickname until auntie Libby coined jujube during one of our Sunday lunches at grandma and grandpa's.  It was perfect!  And 4 and a half years later, it's still endearing ;0)


Lolo was a different matter.  I had already started to refer to him as lemon and lemon drop in utero.  But when we finally met him, lemon just didn't seem right. He quickly (and quite naturally) became lolo, lolobean, lolobear...  I think we all came up with it simultaneously.  He's a lolo! At almost three, he's starting to insist we call him Logan bean, but he'll forever be Lolo to us.  It just suits him perfectly ;0)


As for this little Abbey Violet of ours, well it's proving to be a little challenging because it feels like her very name is already a nickname.  We considered naming her Abigail so we could nickname her Abbey for all of 3o seconds.  When it came down to it though, it had to be Abbey with a "e" after our favourite Beatles album, Abbey Road.  So here we are still trying out some 

early contenders...


First was my little swiss miss.  We had brought a little polka dotted baby bundler to the hospital with us, and seeing as my brain works funny in a crafty kind of way, it reminded me of swiss dots which in turn reminded me of the swiss miss hot cocoa I remember having (and loving) at my friend Amy's house as a teen.  Little swiss miss.  It has a nice ring to it but it's just not the one.


Stephen came up with honey-bunny one afternoon during his paternity leave and it really stuck with the boys.  They like to mush up their little faces and say "aaa-bbey, my little hunny bunny"  It's the cutest thing.  But I'm not sure.  Too generic perhaps.


Then one day Lolo came up with abbioshi - as in Abbey is Yoshi.  The pink one! I got Super Mario Bros Wii for Christmas (LOVE!) and the boys are completely obsessed with it which is good because Stephen and I love to play it ;0)  Well Julian insists on being called Luigi.  Lolo wants to be Mario. And Abbey? Well she's abbioshi! Sweet.  


I'm sure there'll be many more try-outs but I just know that someday soon we'll have the perfect nickname for her too.


Until then, she can simply be my Abbey.  


ps - she's wearing the placket neck sweater I knit for Lolo when he was a wee babe.


pps - she's also wearing my first foray into sewing for her: pajama pants from Amy Butler's pattern in little stitches for little ones.  Love

Wednesday, January 27, 2010

Oh, snap!

I had been looking for a special critter scarf pattern for my lolobean ever since I finished Julian's slithering snake scarf last year, but couldn't find anything that I felt lived up to the awesomeness of Julian's scarf until I fell upon Terry Ross' "what a croc" pattern on Ravelry this fall...


I cast on immediately with some stash Knit Picks Swish worsted (in bok choy) and flew through it using up just 2 balls of yarn. I modified the teeth by picking up stitches around the snout and knitting a short picot hem. I also sewed on some eyes I knit (cast on 10 sts in cream, K 1 row, P 1 row, switch to blue and K2Tog across, cut yarn an pull through remaining stitches and sew to eye socket).


It looked a little plain and thin (and the sides rolled like crazy!) and since I was overdue with my daughter and looking for something mindless to do while I tried to patiently wait for labour to begin (it didn't for 5 days!) I decided to knit a striped lining using the same shaping instructions but without any features or scales. And then because I was really desperate and labour still hadn't begun, I knit 120 inches of i-cord and seamed it together with the croc and lining!


Turned out super cute and warm. And my lolobean loves it. Of course every time I look at it I am reminded of how annoying it is to be overdue (especially when you thought you'd be early), but still, a perfect toddler scarf! Here he is wearing it to "the slope" near Stephen's childhood home: a little incline (it's barely a hill) by the highway where my hubby and his sister used to go as a child (it slopes away from the highway for those who are wondering like I was - crazy).


It was the first time they got to try out their saucers on an actual hill and though I thought they were still little and might find the speed terrifying (I would) they actually found it thrilling! I stayed at the top of the hill with Abbey and could hear their loud laughter unfurling all the way down. Such fun!!


Guess this means we'll need to bring our snowpants, snakes, crocs, and saucers with us to Grandma and Grandpas on Sundays and stop by the "hill" on our way ;0)


Oh happy day!


p.s.: Thank you all for such a nice welcome back! I didn't expect anyone was still hanging around these parts so it was really heartwarming to hear from you all. I am so happy to be back and have so much to tell...

Monday, January 25, 2010

Abbey Violet

It's been almost a year since my last post, and what a year it's been: there were major renos {we finally finished our basement}, a new car {our 11 year old honda got really tired}, growing corn {yeah, that one didn't work out so well}, discovering lego with the boys {now 4 and a half and 3} and finally learning to sew {well that one is on-going}! But the best part 2009 was growing and welcoming a daughter!! Presenting Abbey Violet...

She was born on November 19th. A full 5 days past her due date! We were just so thrilled to finally meet her. She came into the world to the tunes of Bob Dylan's highway 61 and to a handknit little hat that I made while in labour. It was a tad too big!


The delicious Countess Elite and the large size 9 needles were just the right thing to while away labour and I finished sewing on the pompoms (which I had made at home and brought along) just in time to push. Thank you knitting! It was just the thing.


And now of course so many knitting projects are calling...full of frills and lace and girly little things.

My heart is so full <3