As some of you clever readers noticed in Julian's half-birthday photos, I did finish Julian's Christmas cardi in time! And I did not run out of yarn...in fact, I had 2 and a half yards left! No kidding. That's how close it came ;0)

You may notice that it looks very similar to Kate Gilbert's A cardigan for Arwen from the Winter 2006 issue of Interweave Knits magazine . That's because it was heavily inspired by it and sports Kate's cable along both sides and the hood. This one though is sized for a tiny tot, has a basic raglan and hood construction which is different from Kate's version, has simple hemmed sleeve cuffs and has toggle button closures.
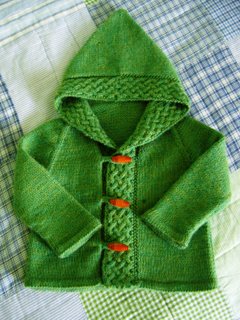
I call this version A cardigan for Merry because in this smaller size and happy green colour I thought it more hobbit-y than elfish. I would have named it after Frodo, but thought Merry was more festive considering I knit it as a Christmas sweater ;0)
Here's my adaptation for anyone interested. You will need to refer to the magazine for Kate's cable charts though as these are original to Kate's design and rightfully copyrighted (I hope). (Note: Kate's original pattern complete with the cable charts is now available as an instant download from her site here).
Here goes...
Size
12-18 months, 24 inch chest, 11 inch length
Materials
3 mm needles, a cable needle, small double pointed needles for I-cord button loops (I used size 0 sock needles), and 6 balls (if you are lucky and really good at yarn economy) or 7 to be safe of Knit Picks Andean Treasure or any other yarn that gives you the proper gauge.
Gauge
26 stitches to 10 cm (4") in stocking stitch using 3mm needles
Pattern notes
It will be easier to sew the shoulder seams if you remember to knit all raglan decreases on the sleeves, back and fronts 3 stitches in from the edge rather than on the first stitch ;0)
Back
- Cast-on 79 stitches and work 4 rows in stocking stitch (knit on right side rows, purl on wrong side rows).
- Work a breaking row by knitting one row on the wrong side and continue in stocking stitch for 4 more rows. On the next row (which should be a right side row) fold the hem by knitting together the first stitch on your left hand needle together with the first stitch of your cast on row. Continue like this to the end of the row. Of course, if you prefer, you can always just sew the hem closed when you are done.
- Continue in stocking stitch until the back measures 8 inches from the breaking row.
- Armhole shaping: cast-off 4 stitches at beginning of next 2 rows (71 stitches).
- Raglan shaping: decrease 1 stitch at beginning and end of every 3rd row 12 times, then dec 1 st at armhole end(s) of every 2nd row 3 times. (41 stitches).
- Place remaining 41 stitches on a holder or piece of yarn to be worked later for the hood.

Front
- Beginning with cardigan right side first, cast on 33 stitches and work 4 rows in stocking stitch.
- Work a breaking row by knitting one row on the wrong side.
- At the beginning of next row (right side), cast on 24 stitches for the right cable and knit across these 24 stitches, place a marker, and knit across the remaining 33 stitches. These 33 stitches will continue to be worked in stocking stitch while the 24 edge stitches should be worked using the right cable chart from Kate Gilbert's original pattern, A Cardigan for Arwen, published in the Winter 2006 issue of Interweave Knits magazine. Note that you can substitute another cable if you prefer -- it will need to measure 2 inches in width though to work with the rest of the pattern.
- Remember to fold and knit the hem on the 33 original stitches once you have worked 4 rows (unless you decide to sew the hem closed later in which case just carry on ;0).
- Continue in pattern until piece measures 8 inches from the breaking row.
- Armhole shaping: Cast-off 4 stitches at beginning of next wrong side row (29 stocking stitch stitches + 24 cable stitches).
- Raglan shaping: decrease one stitch at armhole side at every 3rd row 12 times (17 stocking stitches + 24 cable stitches remaining). Then decrease 1 stitch at armhole every second row three times (14 sts + 24 cable sts remaining).
- Place remaining stitches on a holder or piece of yarn to be worked later for the hood.
- Left cardigan front: work as for right side, using the left cable chart and reversing armhole and raglan shapings.

Sleeves
- Cast on 45 stitches and work hem as for back.
- Continue in stocking stitch increasing 1 stitch at beginning and end of every 5th row, 5 times (55 stitches)
- Work even until sleeve measures 8 inches from breaking row.
- Shape cap: Cast off 4 stitches at beginning of next 2 rows (47 stitches remain).
- Raglan shaping: Decrease 1 stitch at beginning and end of every 2nd row, 20 times, then decrease 1 stitch at each end of every row twice.
- Cast-off remaining 3 stitches.
- Knit the 2nd sleeve.

Shoulder seams
- Sew sleeves to fronts and back.
Hood
- Knit 24 right cable stitches + 14 stitches from right side, pick-up and knit as many stitches from the sleeve cap as you need to to make sure there are no holes (remember how many stitches you added, these will be decreased in the next few rows), knit 41 stitches from back, pick-up and knit stitches from the other sleeve, and knit 14 stitches + 24 cable stitches from left side.
- Work a few rows continuing the cable patterns on each side and decreasing stitches over the sleeves by knitting 2 together for every stitch you picked up and knit in the previous step. You should have 117 stitches remaining including the cable stitches.
- On next row, work 2 centre stitches together so that you have an even number of stitches on your needle.
- Place marker between two centre stitches.
- Increase 1 stitch on either side of your central marker on every right side row, 10 times (136 stitches).
- Continue even until hood measures 8 inches, ending at centre market.
- Fold in half and graft top of hood closed following instructions in magazine to graft cable in pattern.
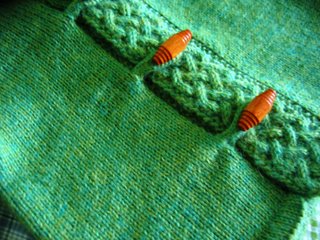
Button loops
- Using the smallest double point needles you own (I used size 0) knit a 3 stitch I-cord for 26 rows and cast-off for each button loop. I made 3.
- Fold I-cord loops and sew to sweater.
- Add buttons on other side.
- Ta-da! A Cardigan for Merry!

Let me know if you make one...and if any of the instructions were unclear so I can make chagnes as necessary ;0)
Cheers!


That is one awesome sweater. Maybe I'll make one for my little nephew!
ReplyDelete( A different "Lisa")
ReplyDeleteI would not be surprised if Kate herself posts about this beautiful sweater! Maybe she'd even make it for Tadpole :)
It came out so beautiful and looks wonderful on Julian. You are quite the designer and perhaps one day you will have your own book out there for us all to benefit from.
Oh my Goodness! This is so cute! Thank you for sharing your pattern. Great job!
ReplyDeleteWow! That is beautiful! And, so is your little one! :)
ReplyDeleteWhat a beautiful, beautiful sweater. I love the green and love it on Julian. Altho, I can see a girl wearing it also. I might knit it for my Jayden in heather blue. You do wonderful work, Anny. Thanks for sharing!
ReplyDeleteWhat a lovely sweater, you really did a good job! Your little one is adorable as well!
ReplyDeleteThanks for sharing...
How adorable!!!! Well done. The color is so striking too!
ReplyDeleteThey seem clear--all the way down to "knit second sleeve".
ReplyDeleteI giggle.
Happy news year to you all and yours.
That sweater is adorable, especially on the wee one. Awesome adaptation -- I'm sure Kate Gilbert is proud of you.
ReplyDeleteIt's beautiful Anny. You'll have to make a baby size one for the new baby also.
ReplyDeleteWhat a marvelous sweater! Thanks so much for sharing the pattern ... I am going to knit one very soon for one or two of the new little ones in my life.
ReplyDeleteHow adorable is your Cardigan for Merry!?!?!? I'm totally making this for my soon-to-be nephew. Thank you so much for sharing it!
ReplyDeleteThat looks great - another pattern for my (huge) to-make list!
ReplyDeleteThat sweater is gorgeous... thank you for all the work you put into posting your modifications.
ReplyDeleteGorgeous - love it! I might have to make this one too - thanks for the instructions!
ReplyDeleteI have to agree with Lisa, maybe Kate will make one for her daughter. I will definately have to put it on the "to do" list for any friends expecting new babes for when they grow up a bit. It is just gorgeous, and the color is amazingly beautiful too.
ReplyDeleteAwesome job on the sweater Anny!
ReplyDeletefabulous! must make one for little sir while he is still little!
ReplyDeletethat is a really beautiful sweater!!!
ReplyDeleteThe cardgian is gorgeous, love the toggles! My husband loves it and was very impressed with your skill and Lord of the Rings knowledge!
ReplyDeleteHappy New Year!
The sweater? Absolutely beautiful.
ReplyDeleteThe baby? Ditto.
I think I'm going to have to make one now! Thanks for sharing!
ReplyDeletethanks for writing it up! It's exactly the size I'm looking for my little guy :) Your model is a cutie pie!
ReplyDeleteMerry is beautiful. As is Mary from a couple of posts ago (I've been on blogcation). Julian is the most precious of all though. Has he decided which of my girls he wants yet?
ReplyDeleteJust stunning! Actually, I think the adult version could use those toggles to good effect, too!
ReplyDeleteOMG! I love this sweater! Awesome awesome awesome.
ReplyDeleteI love the sweater. You've inspired me to size it down for a 6 month old! Thank you so much for sharing your modifications
ReplyDeleteanny it is GORGEOUS!!!! i will definitely give your adaptation a try for our wee ones!
ReplyDeleteXOXO
That Sweater is ADORABLE.. and the prefect present for my neice/nephew due in May!!
ReplyDeleteWow!
ReplyDeleteWhat a great idea and an adorable model! I love your overlapping toggle closure, and the toggle color is a perfect contrast to the apple green. My biggest beef with the sweater in IK was that the sweater didn't close!
ReplyDeleteI'm sorry, but there is NO POSSIBLE WAY that this cardigan could be any cuter than it is. It's possible that it might be the cutest sweater of all time. Now, can I size it down for a newborn, I wonder? *runs off to do math*
ReplyDeleteYou are not going to believe this...(especially since my camera is out of batteries and I haven't been able to post pictures of this WIP on my blog, so I only have proof in text) but I am working on a very similar idea for my baby--Arwyn. I was in the middle of the cover picture from the Debbie Bliss baby book (the one with the ribbing) when I saw that pattern in Interweave and decided that instead of ribbing, I would make the cable separately and sew it to the body of the sweater--after I added a hood. I mean, I HAD to do it...it was a Cardigan for Arwen, right? Your sweater is GORGEOUS, though, and it gives me hope that mine will turn out nicely as well.
ReplyDeleteDid the grafting at the top of the hood drive you nuts? I wish I had known other people were doing this, because I could have used a knitalong. Here's my version:http://chaosvortex.blogspot.com/2007/01/farewell-to-baby-arwen.html
ReplyDeleteBeautiful. You did a great job.
ReplyDeleteOh my god! That is really cute (both the babe and the knitting) and I'm super honored that you liked my pattern enough to modify it.
ReplyDeleteThis is gorgeous! Thanks for sharing your pattern/adaptation. I can't wait to knit this up for my Grand-daughter!
ReplyDeleteThat is too gorgeous for words!!! I can't wait to try it out for my son. :)
ReplyDeletethis is incredibly pretty. i would love to make one. and it is both for girls and boys which is nice. thanks for writing the pattern.
ReplyDeleteThis is so very sweet and I will have to make one for my little peanut. Thank you for sharing!
ReplyDeleteGreat photography! Thanks for the quality!
ReplyDeleteOh wow, that is an awesome jacket. I liked the original but I love this. Never mind the hobbits, I would love one for my little Estel :)
ReplyDeleteThanks a million for sharing :)
I was searching around for an appropriate baby-knit for the newborn daughter of some dear friends, and voila! Your pattern appeared. I had just gotten to the problem with the back shaping, so I am not only grateful for the fabulous pattern, but the timely posting of errata as well.
ReplyDeleteThank you so much for sharing this with us.
I am so glad I saw this! It has moved to second place in my knitting list, right after I finish the Eris for my daughter, I want to make this for my granddaughter.
ReplyDeleteThank you!
Super cute - and thanks for sharing the pattern.
ReplyDeleteOh It is absolutely Adorable..
ReplyDeleteLove the color also..
Thanks for sharing the pattern
Penny
http://pennyknits.blogspot.com/
I'd love to make one, but I'm curious as to how you sew on the i-cord loops for the toggle button - could you post a tutorial or any advice on how to sew those on well?
ReplyDeleteThanks for sharing such a great pattern! -- Carla
(another different "Lisa")
ReplyDeleteI love this and I'm about to start one for my daughter in red as soon as the yarn arrives. I know another poster asked this but do you have any suggestions to making this for a 2 year old? I'm new to sweater knitting and don't trust myself to size it up without messing it up. Thanks!
And good luck with Wee One coming! I had several nesting bursts a few weeks before my daughter came so hang in there and relax. :)
This is a wonderful sweater. In fact, I think I like your version better than the original! I'm seriously thinking about sizing it *up* for an adult! It has the features that make the original sweater so great, but a more standard sweater shape. And your baby looks adorable in it!
ReplyDeleteBless you, Anny! I scoured the 'net for a perfect sweater pattern for my daughter. Never dreamt that someone would have adapted this pattern! I drooled and sighed over this in Interweave. I am so excited to start and so very admiring of your talent and your beautiful family. Congratulations!
ReplyDeleteI'm having a little trouble with the front shaping -- the fronts are shorter than the sleeve/back shaping - back and fronts both start shaping at 8" and are identical. But then the back continues decreasing for 6 more rows and the fronts do not.
ReplyDeleteMy back and sleeves matched up perfectly for seaming but my fronts have to be stretched pretty hard to match up.
I'm not sure what to do - I have the correct stitch count (17 stockinette stitches + the cable.) I've not knit an in-pieces raglan before -- are the fronts supposed to be shorter like that?
I just found out that we're having a girl (in Sept) and I plan to make this sweater in a lavender!! Can't wait!! So glad you shared the pattern!
ReplyDeleteI love this sweater so much that I ordered the Interweave Knits issue and I will make one for me and one for my daughter!
ReplyDeleteThank you for this wonderful idea!
nina
Wow This is a gorgeous sweater Thank you for sharing your pattern
ReplyDeleteI'm starting it tonight!
I am in love with this sweater! I'm at the sewing together before the hood and came back to find out why my fronts were too short, but Beanmama already asked (thanks!). It's the cutest thing I've ever (almost) made thanks to you. Sending pics as soon as I'm done!
ReplyDeleteHi! I'm in the home stretch and back with a quick question: When measuring the hood, is it 8 inches up from where the increases began or 8 from after the increases? Thanks!
ReplyDeleteI'll be rinting this off to file with my copy of the mag. I'd probably never make Arwen for myself, much as I love it,but I think it's fair to say that my grandson will be getting a Merry Cardi
ReplyDeleteI love it, I love it, I love it! I'm starting one now!
ReplyDeleteI wish this was in bigger sizes for
ReplyDeletetoddlers too, it's just soooo cute,
but too small. :-(
Where can I find the toggle buttons in colors?
ReplyDeleteannesins@charter.net
Hi,
ReplyDeleteI started this sweater with a dk yarn and it calls for #6 needle... I am doing it on a #3 needle but the bottom of the back keeps rolling up... I tried both ways... I knitted it up as I was going ..it rolled.. then I sewed it up/// Maybe my yarn is too thick??
Can you tell me the problem some were having with the fronts being too short so I can watch for that when I get to the front.. Thanks..
Penny
peneloercola@aol.com
Wow!!! I'm just in the middle of knitting an Arwen for myself, and happened upon your pics in flickr. I read your blog frequently, but hadn't seen this. What an incredible adaptation!! I'm inspired to give it another try, but for one of my little ones this time. Thanks for sharing!
ReplyDeletethankyou thankyou thankyou for the gorgeous pattern. finally finished my 8 ply, deep red version for my Hannah (just in time, hope no growth spurts are imminent and spring isn't too warm).
ReplyDeleteThis is absolutely one of the most beautiful cardigans I have ever seen for a child. You are an amazing knitter.
ReplyDeleteGreat story as for me. It would be great to read something more concerning this topic.
ReplyDeleteBTW look at the design I've made myself Young escorts
I need your help for the instruction for Cardigan for Merry. One of the statements for making hood. Increase 1 stitch on either side of your central marker on every right side row, 10 times ( 136 stitches) after 117 stitches and two centre stitches together for the center of the hood. I want to know if it is correct to increase one before the marker and one after the marker in the same row. Is it correct? The word either bothers me and confuses me. I do hope that you will be able to answer. Thank you Karen McKenna
ReplyDeleteHey!!
ReplyDeleteI really really want to make this "Cardigan for Merry" I am a newbie and wonder if anyone has the cable written out instead of using the cable chart. I did download the sweater from Kate Gilbert and she refers to the cable chart to use.
ReplyDeleteHelp.
knittiegrammie
That children clever very nice.
ReplyDeleteI like your post! Is it really so that you say? I barely can believe that. Once a friend of mine told me something similar. That’s very interesting indeed.
ReplyDeleteThat looks adorable - nice work!
ReplyDeleteHello, oh what a pretty baby. I have read your post with pleasure.
ReplyDeleteyou must be aware that you have a really nice blog must be very much thankful to you because of this awesome blog reverse cell phone lookup
ReplyDeleteThank you for sharing, most generous of you!
ReplyDeleteWow! Two huge sales on a Saturday - you really can't beat that.
ReplyDeleteLooking very cute and useful in winter season.
ReplyDeleteI like its color very unique. Thanks a lot for sharing this nice and cute sweater.
Smith Alan
I love the green and love it on Julian. Altho, I can see a girl wearing it also. I might knit it for my Jayden in heather blue. You do wonderful work, Anny. Thanks for sharing!
ReplyDeleteStainless means that it will not rust under normal conditions, cast means that it is poured into a mold.
ReplyDeleteHello Dear,
ReplyDeleteReally your blog is very interesting.... it contains great and unique information. I enjoyed to visiting your blog. It's just amazing.... Thanks very much for the share & keep posting such an informative articles. I'm looking forward to your blog. Thanks!
Today, most of the businesses have set up their web presence. Hence, to concentrate your endeavors on running your business online you need to seek the pertinent help of a SEO solutions expert. Thanks of a SEO Services India
ReplyDeleteReally amazing dresses for kids.... Very interesting blog post here.... Thanks for the share... Thanks and keep posting...
ReplyDeleteGalvanized steel is steel that has been hot dipped in a pool of molten zinc. The zinc adheres to the steel, cools and hardens to form a rust inhibition finish to plain steel.
ReplyDeletestainless steel compression tube fittings
Its amazing to feel the winter. Its keep it cool and warm. thanks for sharing this article.
ReplyDeleteOnline kamagra
Buy Super p force
Great share thanks for the read!
ReplyDeleteWow, the collection is cool for the kids. Also the creativity you have shown in creation of the blog is also admirable.
ReplyDeleteCute child & nice sweater both are looking gorgeous.
ReplyDelete:)
Regards
Jennifer Aniston.
Pretty nice cardigan and that suits julian a lot.he looks so cute..thanks for sharing these instruction's of making this cardigan.
ReplyDeleteGood share thanks for the post!!
ReplyDeleteReally you have done great job,There are may person searching about that now they will find enough resources by your post.I like this blog..
ReplyDeleteBlogger how when you visit my site,
My Site created for men's health,
Here the best method for you and get the best Penis Enlargement Pills today.
VigRX Plus | Vimax Pills | Prosolution Pills | Penis Pills | Penis Device | Penis Exercise | Penis Patches | Penis Enlargement
Jeg elsker sweater. Du har inspireret mig til den rette størrelse ned til en 6 måneder gammel! Tak så meget for at dele dine ændringer.
ReplyDeleteThanks for guiding me about it .
ReplyDeletethe collection is usually cool for the children. Also your creativity you have shown inside creation of your blog is also excellent.
ReplyDeletegreat!
ReplyDeleteI saw that pattern in Interweave and decided that instead of ribbing, I would make the cable separately and sew it to the body..
ReplyDeleteIt is a very informative and useful post thanks it is good material to read this post increases my knowledge
ReplyDeleteengraved gifts
Thanks for the posting. Loads of excellent writing here. I wish I had found this site sooner
ReplyDeleterotherham hypnotherapy
Nice post!! thanks for sharing!
ReplyDeleteHi, thanks for post... it is very useful for me ;) keep posting around.
ReplyDeleteHappy to see your blog as it is just what I’ve looking for and excited to read all the posts. I am looking forward to another great article from you. best vpn
ReplyDeleteIt definitely stretches the limits with the mind when you go through very good info and make an effort to interpret it properly.
ReplyDeleteTesco car insurance
I certainly enjoyed the way you explore your experience and knowledge of the subject! Keep up on it. Thanks for sharing the infocremation urns
ReplyDeleteWow, This is so cute! free date sites . Thank you for sharing your pattern.
ReplyDeleteI wish this was in bigger sizes for
ReplyDeletetoddlers too, it's just soooo cute,
tribal tattoos but too small. :-
More power to your blog,I like the revolution one a lot.
ReplyDeleteHey, good post! Here is nice vibram five finger sharing with you, just enjoy! I promise it won't let you down! So don't miss it!
ReplyDeleteI really admire the way you present your ideas. Excellent blog post. Highly informative. Thank you.
ReplyDeletenice work
ReplyDeleteVery Very interesting blog. I'm feel so glad to read this blog and I'll tell about this to my friends.
ReplyDeleteSmead office products
You made some good points there. I did a search on the topic and found most people will agree with your blog.
ReplyDeleteThis post, now that i know your blog I will read from it more often,very nice Thanks for sharing
ReplyDeleteCute baby I want to learn making this clothes for babies.
ReplyDeleteI could tell how great you are in your field of interest. You could relate in each detail very well. Thank you for spending a time on sharing such informative writings to us.
ReplyDeleteI’ve seen progression in every post. Your newer posts are simply wonderful compared to your posts in the past about buy generic provigil. Keep up the good work. All the best for the future.
ReplyDeleteGreat stuff from you, man. I've read your stuff before and you're just too awesome. I love what you've got here, love what you're saying and the way you say it. You make it entertaining and you still manage to keep it smart. I cant wait to where to buy darvocet n 100 read more from you. This is really a great blog.
ReplyDeleteThat is something unusual! I will try something new so thanks for your article and everyone's posts! Cheers to all of you!
ReplyDeleteI so love that happy green color! You are awesome, I wish to create ones for my little ones! I have a toddler and an infant this time. :-) phentermine 37.5
ReplyDeleteThis comment has been removed by the author.
ReplyDeleteThanks for sharing this post, now that I know your blog I will read from it more often.
ReplyDeleteThanks for sharing. You have really a great knowledge of this subject.
ReplyDeleteI really enjoy reading the post, thanks for sharing I really like it, I already bookmarked it, thank you guys.
ReplyDeleteThis is great so cute and adorable i like it. :) insanity reviews
ReplyDeleteWow! Thank you! I always wanted to write in my site something like that. Can I take part of your
ReplyDeletepost to my blog?
Dating sites
It was very interesting to read.
ReplyDeleteserve as a reference
This information is very interesting, I really enjoyed, I would like get more information about this, because is very helpful, thanks for sharing!
ReplyDeleteIt's a very good article. Thanks for sharing this informative post!
ReplyDeleteA Cardigan for Arwen, published in the Winter 2006 issue of Interweave Knits magazine.
ReplyDeleteOMG that's so cute Anny, i love the design and the color is beautiful. Great job, very cool.
ReplyDeleteMaria Sherperr
Dublin University
The First Years Wave Stroller
Love this Anny, really beautiful job. I wish i could knit as well as you. Usually my cardigans are more like old fishing nets. Great job.
ReplyDeleteKaren Brady
Sligo University
How to have self confidence
This is really an awesome post! I really enjoyed, I would like get more information about this, because is very beautiful, thanks for sharing!
ReplyDeleteYour progress report on HDTV - part 3 is interesting as it seems on trial and error methods. This is how success is achieved. I am waiting for its full version. Thanks for the information.
ReplyDeleteAbilene Roofing Contractors
good job
ReplyDeleteVery nice submit, i definitely love this web site, carry on it.
ReplyDeletecredit repair debt consolidation
How generous you are to share this great pattern. I can't wait to try it out. It's beautiful! Search Engine Placement Marketing
ReplyDeleteI like this cardigan and its name also "merry".I will try it by its steps as given but it is a hard job.
ReplyDeletedating sites
Nice post! Thanks for sharing!
ReplyDeleteAdidas have unveiled their supercharged Elite Nike vapor soccer shoes, designed and engineered to provide new levels of performance. The SoccerBible is your first stop for full and exclusive images of the Nike CTR360 II ELITE. The Nike T90 Laser Elite are truly a stunning boot, both visually and in-hand. Set to be championed by Wayne Rooney at this summer's World Cup, the Nike mercurial vapor fg are almost a hybrid boot as they combine Laser technology and Nike mercurial vapor with the Vapor series!Nike Mercurial Superfly.
ReplyDeleteI just realized it on the internet many interesting and good information like this ... Your writing is very good
ReplyDeleteDENTAL IMPLANTS REVIEWS
Many thanks for the exciting blog posting! I really enjoyed reading it, you are a brilliant writer. I actually added your blog to my favorites and will look forward for more updates. Great Job, Keep it up.. :)
ReplyDeleteMany thanks for the exciting blog posting! Our team of travel experts will guide you on your perfect italy tours.
ReplyDeletethese are all beautiful especially the little one he is cute.
ReplyDeleteGreat Resource! We LOVE books at my house, so FREE is always good as we cycle through them so fast.
ReplyDeleteI absolutely benefit from browsing any place, kudos meant for posting I enjoy it all, thank you so much individuals.
ReplyDeleteinteresting read
ReplyDeleteThose are really very helpful blogs. Though I am not a fashion designer, but it will also help me in my career to design something.
ReplyDeleteReally great work, I would like to join your blog anyway so please continue sharing with us.
ReplyDeleteI am stunned from your professional writing skills. I have always said that good writing is a gift it is not something you can learn. Really amazed by it. But i did not expect to find it in a blog. So I'll check on your blog more often.
ReplyDeletePretty nice post. I just stumbled upon your weblog and wished to say that I’ve truly enjoyed surfing around your blog posts. After all I hope you write again soon!
ReplyDeleteYup..That's true. Its really a nice post to read. I really enjoyed reading this post. Truly amazing. Most of the time, we didn't get the best topic to read but seriously this is the best topic to read..
ReplyDeleteMy Blog : Watch Apollo 18 Online
I really happy to be visiting your blog. Thanks for the share.... Keep posting such an interesting information. Very good tutorial, easy to follow.
ReplyDeleteThis is mainly a client side feature which could be used for Flex based AIR applications. Browser based Flex applications can not take advantage of this feature as it needs client side SQLite DB which is offered only by AIR platform.
ReplyDeleteAlso, There are a few ColdFusion Interfaces defined on server side, which user need to comply with while writing their CFC having “Fecth” and “Sync” methods.
A very good and informative article indeed . It helps me a lot to enhance my knowledge, I really like the way the writer presented his views.
ReplyDeletegood information thanks a lot.
ReplyDeleteHi Goodmorning, I am very thankful for the very informative post you got their. I am looking for a step by step guide on how to make knitted items. looking forward to read another great post from you as i will be following you blog. thanks
ReplyDeleteThis comment has been removed by the author.
ReplyDeleteYou did a great job. i like your blog very interesting..thanks
ReplyDeleteaww what a cute baby.
ReplyDeletegreat blog, I enjoyed reading this very much, btw love the pics.
ReplyDeletegood topic and well written
ReplyDeleteThis is really an amazing topic. I really enjoyed reading it. Its really superb and the pictures too. Really appreciated..
ReplyDeleteMy Site : Watch I Don't Know How She Does It online
you clothe is so fantastic, the color is so good looking. I really love those for my baby. all I can say is wow. .
ReplyDeletecan you also make that one for a android phones? I have android phone with a software protection:
phone spy software for the safety of my phone.Android phone locator for the tracking of my location.
android gps apps locator and tracking my route.
android tracker also a tracker for my gps.
phone spyware
phone tracker
spy phone android
android gps
cell phone tapping
cell phone spying
cell spy
cell phone spying..
It really helpful those apps.
I am totally enjoyed with the nice feedback here. Some of the outstanding and speechless stuff you have posted here. I must say thanks. Awesome work
ReplyDeleteBabies and kids are very compulsory for a home hustle and bustle. Children health and mood is very soft and it feel easily and early the hot or cold. Their health requires a big care for their breeding. For example clothes and food. I have also a website for
ReplyDeleteHealth care insurance is given as
http://www.insurancebrokerillinois.com
Victor Salamon
would you mind updating your blog with more information? It is extremely helpful for me.
ReplyDeleteYou made some good points .I did a little research on the topic and found that most people agree with your blog. Thanks.
ReplyDeletebuy online vicodin es
wow!!That is one awesome sweater !This is so cute! the color is amazingly beautiful too. You do wonderful work. Thanks for sharing!
ReplyDeletefree spy software
free cell phone spy
cell phone spy software
Wow, nice post, there are many people seeking that now they will find sufficient resources for you to share your post. Thanks
ReplyDeleteThis is the best sweater, kids love these color combination too. simply very cute.
ReplyDeletefree dating sites
It's really appreciable message for every body thanks for sharing this information.
ReplyDeleteThis should keep me busy for a while! Thank you so much. Hope I will get some great stuff soon from you.
ReplyDeleteWow thats the very beautiful sweaters to gift someone who has a sweet little cute baby.
ReplyDeleteThese sweaters are so cute for a sweet little baby, thanks for such a cutey sweaters....
ReplyDeleteYou have a very good blog that the main thing a lot of interesting and useful!
ReplyDeletethat is one little bitty sweater - I think I have handkerchiefs bigger. anyway if you need no upfront fee Credit repair check out these guys.
ReplyDeleteNike brand popular in the world, now we see this is a
ReplyDeleteNice post and this post helped me a lot in my college assignment. Thank you seeking your information.
ReplyDeleteThe next time I read a blog, I hope that it doesnt disappoint me as much as this one.
ReplyDeleteLove this Anny, really beautiful job. I wish i could knit as well as you. Usually my cardigans are more like old fishing nets. Great job.
ReplyDeleteFree spyware removal
I really like the way the writer has presented his views. I hope to see more great articles in the future as wel
ReplyDeleteI like your website. Thank you for great information. I will come back to your website again.
ReplyDeletebest regards
vely vely vely nice work and very nice effort done for this blog it is very cool and informative blog thanks for sharing it
ReplyDeleteIts an interesting post. I have read all the views here. Its amazing.I like it & had a great time by reading it.
ReplyDeleteMargaret The Movie
Thanks for spending the time to discuss this. I feel strongly about it and love reading more on this topic. You are very bright.
ReplyDeleteYou have made your point here, I learned so much from this post.
ReplyDeleteThis is truly an amazing post. I have not yet read such an amazing post like this before. Truly appreciated..
ReplyDeleteMy Site : Watch Real Steel Online
Not sure why this page is taking too long in loading, please enhance the speed of your website. Thanks
ReplyDeleteDubai Apartments for rent
The information in your article is incredible. Very good article.
ReplyDeletethis is so cute .. great work thanks for sharing !!
ReplyDeletepower inverters
ups prices
Solar Tubewell
I like this patern very much.The green color is perfect for my baby boy ;)
ReplyDeleteThis is the best sweater, kids love these color combination too. simply very cute.Reading your wonderful article.
ReplyDeletehealth insurance il
Happy to see your blog as it is just what I’ve looking for and excited to read all the posts. I am looking forward to another great article from you.
ReplyDeleteThanks for your post, I like this post very much.
ReplyDeleteYes, the post is very interesting and I really like.
ReplyDeletecool sweaters; just in time for the holidays--and it is getting cold.
ReplyDeleteHey its been really a very good and informative post to read on
ReplyDeleteSuch a nice post. Keep it up.
ReplyDeletelol funny looking kid..
ReplyDeleteKeep sharing article like this.This is something very relevant to the topic.Keep posting articles that are really informational.
ReplyDeleteSuch a lovely web design! And the content here is simply fabulous. All the best in your endeavors! Reverse Cell Phone Lookup | Motion Detector Lights | Used Pellet Stoves
ReplyDeleteHi ... I just stumbled upon your post.. a gud view point.. Hey ur post left me quenching for more Your post really gives out useful knowledge.. thanks
ReplyDeleteSarongs
Any suggestions on making it for a 2 year old? :)
ReplyDelete